Thursday, November 25, 2010

Review of the Nikon GP-1 GPS Unit

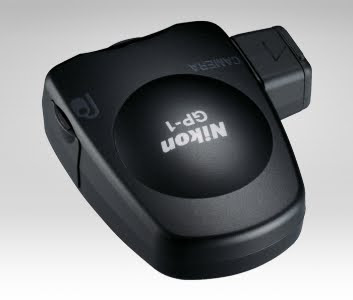
So I've decided to go at yet another tangent on this blog and write a review of the Nikon GP-1 GPS Unit pictured above. I've owned this unit for over a year now and have used it extensively so maybe this review might provide some insight that a normal review over a few days wouldn't/couldn't...

So what does the Nikon GP-1 do? Well essentially it's a small GPS receiver that attaches to a compatible Nikon camera (not all Nikon cameras have a GPS port so check whether yours does before buying!) and essentially records GPS data about where the photo was taken as part of the image's EXIF data. That data can then be used to place the photo on a map. For example, one could use it to upload a photo to Google maps and have it show up when people search that particular place where you've taken the photo. Several other such services exist of course; it needn't be Google. Flickr does this too; in fact most of my photos on Flickr have been geotagged using the GP-1 and the result can be see on my map. Neat huh?

So what is there to say about the Nikon GP-1 other than what it does. Well, first off I should say that I absolutely love it. As a techie, such a gadget really is up my street :-). I love the convenience it provides of knowing exactly where a photo was taken and not needing to remember the names of the places you've visited or the particular street you were in etc... It's also very light and not cumbersome as it can be attached to the camera's hot shoe or the strap. In summary, I'd buy it again without hesitation if I needed to.

All this said and done, I thought I'd warn of a few pitfalls you may want to consider:

First of all the price. They're currently selling at around the €200 if you shop around. That's not cheap for a GPS receiver (compare that price to a basic car Sat Nav these days). I guess it's a niche market and there's therefore little by way of competition for Nikon in this area. Still, I guess part of the price is justified by how small it is.

Secondly, battery consumption is also a consideration. The GP-1 unit feeds off the camera's battery directly and can drain it. I tend to leave the GP-1 unit on all the time as long as my camera is on. There's a power saving option of it turning on only when you press the shutter half way but I find that this then wastes me time waiting for it to find it's location. I therefore prefer to leave it on continually tracking satellites so it knows my location as soon as I decide to take a picture. As a result though, battery drain is significant. I'd guesstimate that battery life drops by a half to a third of the normal time. That said, this doesn't bother me much either. Third party batteries are fairly cheap these days and I'm more than happy to have three or four of them in my camera bag charged up and ready in case I need.

A third consideration is receiver sensitivity. In other words, just how good its GPS signal reception is. Most professional reviews will quote a satellite acquisition time or around 45 seconds. In my experience though, this is somewhat optimistic. If you've got a clear sky above you and you're in an open space, then 45 seconds sounds about right. In practice though, the time it takes for the GP-1 to acquire the satellite signals will degrade severely if you're close to tall buildings and/or if part of the sky is obstructed in some manner. For example, it can easily degrade to 2-3 minutes if you're shooting photos inside a car. To be fair, all GPS receivers will suffer from this problem. At the end of the day, if a good portion of the sky is obstructed in some manner, then a GPS receiver may not be able to acquire the satellite signals it needs to work out the location. The point I want to make here is that you shouldn't expect it to perform as well as other GPS receivers you may be used to. For example, it takes considerably less for my Sat Nav to work out it's location inside a car then it takes the GP-1 unit. I guess this is partly the price to pay for it being such a compact unit.

The final consideration is my only real complaint about the device. For some odd reason, Nikon came up with two connectors for the device. One for the Nikon D90, the GP1-CA90, and one for the higher end cameras (i.e. D300s, D700 etc.), the GP1-CA10. The D90's connector is a rectangular connector; somewhat like a small USB plug. The one for the higher end cameras is a round connector. Since I've got the Nikon D90; I use the square connector. The problem I had with this is that I initially use to leave the connector always plugged into the camera's socket (even when not using it) as I thought removing it and re-inserting it would eventually lead to it becoming loose. After four odd months of using it though, the camera's socket became loose anyway and, as a result, the camera would no longer detect that the GP-1 was connected. Thankfully my camera was still under warranty and the socket was replaced free of charge by a Nikon repair centre. Since then, I've decided to remove the connector when I'm not using it and only insert it when I'm going to use the GP-1. It's been nearly a year now and so far I haven't had any issues. That said, it seems to me that the design of this (lower end?) connector is faulty. Having a square connector/socket means that it's more prone to being damaged/becoming loose if a force is applied to it in any direction (e.g. if you hit it against something or if it's squashed in the camera bag). A round connector makes considerably more sense in this case. Secondly, if you've had a look at the two connectors, you'll realise that the GP1-CA10 (round) connector has the added advantage that the wire exits the connector at 90 degrees to it, whereas the wire for the GP1-CA90 exits straight out. As a result, the GP1-CA90 protrudes out of the camera body considerably more and is therefore more likely to get in the way/be accidentally hit. Given this seemingly obvious design flaw, I'm not sure why Nikon came up with a new connector for the Nikon D90 (the connector for the higher end cameras predates the one for the D90) and, worse still, why it seems to have stuck with it for the D5000 and the new D7000...

On balance, I still have no problem giving the thumbs up to the GP-1. Even though the above is a fairly serious design flaw, I have had no problem with the connector once I started removing it when not in use and I'm hoping this persists. So long as one is a bit careful with it and takes into account the above drawbacks, then I think it can work really well and can turn out to be very useful, especially when doing travel photography.

Hope that helps. Let me know if you've used the GP-1 and/or are considering one and have any other thoughts/questions about it.
Monday, November 22, 2010

First Impressions of Adobe Lightroom 3.0

So I decided to make use of the 30 day trial of Adobe Lightroom to see what gives. I've been looking to replace some of the software I use for two reasons:

  1. To make my workflow somewhat faster. I invariably spend hours going through photos I've taken and at times it's a bit of a chore; I'd rather spend more time taking pictures!
  2. I was/am using Nikon's ViewNX software to go through my RAW files, decide what to keep and do initial adjustments (white balance, exposure etc.). The biggest problem I've encountered is that this software seems terribly unstable and leaks memory on Windows 7 64-bit. I've even tried running it using Windows XP emulation mode but with little improvement. As an aside, I'm wondering when Nikon will wake up to 64-bit software. Even their RAW codec is 32-bit only...

Lightroom has been installed for four odd days now so I've still got to get to grips with it. Already though, I can see some of the benefits to it. If you do master it, then I think one would be able to minimise the use of other software (cost saving?) and the associated time wasted loading pictures and editing them. As a concept, it's a sort of one-stop-shop for post processing and could work well for me unless I'm doing HDR or Photostitches.

That said, there are a few things I miss/am annoyed at/haven't yet figured out...

  • One feature I miss from ViewNX is that you can right click on an image and copy/paste GPS data. There seems to be no equivalent in Lightroom. I used to find this feature particularly handy as often I'd shoot several pictures from the same exact spot but only a few would have GPS information (e.g. due to tall buildings nearby etc.). With this feature, I could easily make sure all my images had GPS data. I can't seem to find an equivalent in Lightroom.
  • I can't seem to figure out if/how to set Lightroom to auto synchronise with my pictures folder. I've added all my pictures folder to Lightroom and it built up it's data just fine but now it seems that whenever I add new pictures to the folder, I've got to manually synchronise Lightroom? Maybe it's because I'm somewhat old school and like placing pictures in appropriately named sub-folders manually (so I'd rather not have Lightroom auto-import pictures and place them in the My Pictures folder automagically). Those of you who have use Google's Picasa will know what I'm speaking about. Picasa seems to watch the My Pictures folder (or any folder you set for that matter) and automatically update it's own database when you fire it up.
  • Whilst it's got a few presets for creating vignettes, I can't seem to figure out how to manually tune these (surely there's a way!). For example, what if I want to adjust the opacity of the vignette or place the focus off centre?
  • The clone tool seems to be very good at what it does. You first encircle what you want to cover and then, with a second circle, you choose where to clone from. One can resise the circles as well as move the source circle around to choose the best spot to clone from. For cloning out 'spot' objects it therefore works great. That said, there seems to me to be no easy way of cloning out non 'spot object/things that aren't confined in a particular area. For example, with panorama photostitches, I frequently need to adjust the horizon (especially if it's a seascape) as this comes out jagged form the stitching software. To this end, I can't seem to find a way to drag the destination clone circle along my horizon so that I even it out.
  • I'm not fond of the flat structure with which all the photos are present in the photostrip at the bottom. As alluded to above, I usually seperate pictures into various subfolders in the My Pictures folder. I then like viewing pictures in a given subfolder alone as the subfolder typically represent sone shoot/collection. With Lightroom, once I imported all of My pictures into it's database, what I get is a strip at the bottom with all of my photos in the My Pictures folder. I can't seem to find a way to get it to display only what's in a given subfolder.
That's about all I've got to say about it. I don't want to give a wrong impression here; doubtless Lightroom is a very good piece of software and the main issue here is that yours truly hasn't quite mastered it yet. I'll give it some more time and then maybe blog about it at a later date once I've learned the ropes a bit more. Thought I'd jot down my initial quibbles in case anyone else has noted them or, better still, has a solution for them!

Sunday, November 21, 2010

First HDR Panorama!

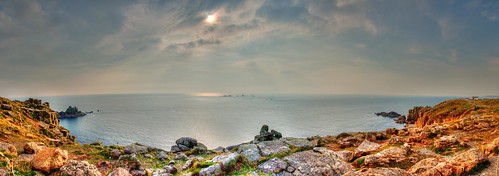
As can be seen from the picture below, I managed to stitch my first HDR panorama this past week :-).

Nothing to write home about; I'm not too sure I like the HDR results in this particular image as the foreground is somewhat oversaturated and there's a halo effect around some of the stones and rocks. Still; this is really down to my lack of experience with HDR and the quality of the original exposures making up the stitch in the first place.

I guess the above image is more of a 'proof of concept'; that is that stitching HDR panoramas is possible and actually quite easy!

The trick is to generate the tonemapped HDR images first and then stitch those together. I was previously trying to (somehow) generate three photostitches at different exposures and then combine those. Though this should also be possible in some way, it can be extremely messy and I didn't have any luck myself. It's much easier to have all the source images as tonemapped HDRs and then just perform one photostitch of all of them. For some reason I originally thought that, due to the noise etc. introduced by tonemapping/HDR, the photostitching software would have difficulty stitching tonemapped images together. I couldn't have been more wrong; in fact the photostitching result of the above tonemapped/HDR panorama are considerably better than the equivalent photostitch from the normal images.

One thing I found very handy is Photomatix's batch processing feature. Since I had loads of source images making up the panorama, I simply tested and tuned the tonemapping results for one of the images and then subsequently used batch processing to do the same for all the source images making up the panorama. That done, I left the PC to do the number crunching for an hour or so and came back to find tonemapped/HDR tiff files that I could then stitch together!

Neat feature this.

Friday, November 12, 2010

It's been a while...and what about photostitches?

It's been a while (well over a year actually!) since I've written anything here. I originally started the blog with the intention of learning photography related stuff and then blogging about it (teaching is the best way to learn they say...) but work and other commitments soon got the better of me :-(. Ah well, now is as good a time as any to give this another go I figure...

I need to build on my previous explanations of angle of view and perspective but before I do that (in future posts), I'm going to write about something else: Photostitches. If you follow my photostream, you will have probably noticed that I've become particularly fascinated with photostitches of panoramas over the past year or so. By no means have I become good at them, but at least I seem to have picked up a few tips and tricks along the way which seem to help me get some results. So I thought I'd jot them here in case anyone else finds them useful or in case I forget them over time :-). In point form:

  • Use a relatively small aperture/large depth of field: When doing a photostitch, the number of possibly interesting things/subjects in the resulting photo (nearly) multiplies with each photo added as part of the stitch. As a result, it's considerably more likely that you'll have something of interest in the foreground as well as in the distance. Having a shallow depth of field here is therefore not desirable as it will likely result in either the foreground subject or the distant subject being out of focus. I therefore typically pick an aperture of around F/11 (maybe even smaller if lighting permits it). F/8 is the least I think one could get by with...
  • Wide angle: In relation to the above, keeping a wide angle helps in allowing for a greater depth of field. Depth of Field after all is a function of aperture, distance from the subject and zoom. Besides, keeping a wider angle should help keep the number of individual photos you need to make a stitch of a given panorama to a minimum. The trade off here is that you'll lose some detail but at least you won't spend hours waiting for the software to stitch the result! In practice, nearly all of my stitches are shot under 25mm focal length on a crop sensor (37.5mm full frame) and in practice most are around the 18mm mark (27mm full frame) if not lower.
  • Low ISO: Desirable for any photo really; photostitches are no exception. There is an added consideration though that extremely high noise (e.g. ISO 3200 or higher) can throw the stitching software off course when comparing two images to be stitched...
  • Shutter speed: All the above already hints at various settings that you'd need to set manually. If truth be said, it's probably best to set shutter speed manually as well. Setting shutter speed manually ensures that you get a panorama that's more representative of the actual scene being photographed. For example, if one side of the panorama is brightly lit (e.g. due to sunlight) whilst the other one is darker (e.g. shadowed by a building), then you probably want this difference showing in your final photostitch. If the camera were to decide shutter speed for these two different ends of the scene, it might decide on a fast shutter speed for the brightly lit corner and a slower shutter speed for the darkly lit one. The camera does this to try and get a balanced exposure for each shot but in this case we probably want to represent the difference in lighting between one end of the panorama (i.e. one shot) and the other. It's therefore probably ok for one end to be slightly overexposed and the other to be slightly under exposed as these will probably balance each other out once the panorama is stitched. The trick is deciding on the correct shutter speed. To do this, I usually fire a few test shots of the scene before. In particular I concentrate on an area of particular interest in the whole scene to be photographed and decide the shutter speed based on that areas. This ensures that the area of particular interest will be correctly exposed whilst other areas may then be slightly under or over exposed.
  • Manual Focus: Besides exposure, it's also a good idea to set focus manually to. Though we've opted for a small aperture (so a large DoF), if we leave the camera on auto focus, it might decide to focus on the foreground for one shot and at infinity/the horizon for another. You may therefore end up with two shots belonging to the same panorama, only one has the foreground in focus whilst the other is focused on the horizon. That's clearly undesirable as ideally the panorama should be in focus at the same distance from the camera throughout. Worse still, when shooting a panorama, it's quite likely that the camera might not be able to find automatic focus for a particular shot within the sequence. For example, this may happen if there's nothing interesting/of contrast in one particular shot (e.g. just sea and sky with no clouds). Manual focus overcomes all these issues so it's best to use it. Just one other note on this subject, if you're like me and find focusing the camera manually somewhat tricky (due to wearing glasses, squinting etc.), there's a trick I usually use: Use Auto focus to focus the camera on a particular shot/subject in the camera you want to be in focus and then simply flick the switch to manual focus without touching any of the lens focus rings. In this way, the camera should be focused on the subject that interests you in the panorama and should stay that way so long as you don't touch any of the focus rings or flick the switch back to auto focus.
  • AE-L/AF-L Button: One other trick I usually use as a shortcut for all the above and when I'm not using a tripod is to hold down the Auto Exposure-Lock/Auto Focus-Lock button on the camera. If your camera has such a button, then I'd recommend getting acquainted with it :-). I typically set the aperture and ISO to what I want them to be (I use Aperture priority for this) and then focus/meter (press the shutter release button half way down) on a particular scene in the panorama. As a result, at this point, the camera decides focus and shutter speed. I then press the AE-L/AF-L button and, so long as I keep this button pressed down, all the settings (focus/shutter speed/iso/aperture) remain as is. This therefore serves as a quick way around having to set all the setting manually. All I do is keep the button pressed down and shoot all the pictures that make up the panorama with the button pressed down. Voila! Unfortunately, I can't really use this button when shooting on a tripod as I have to keep it pressed down and that could introduce shake/vibrations from my hand. Maybe your camera has some form of a lock for this button so you needn't keep it pressed. Best to check the manual as that would mean you could also make use of it on a tripod!
  • Tripod: Some of the above constraints make for a low shutter speed so you'll want to shoot on a tripod whenever possible. Besides, keeping the camera on a tripod helps ensure that you keep the same perspective for each individual shot.
  • Manual white balance: Set the white balance manually on the camera for all the shots. I know that when shooting RAW you can adjust white balance afterwards but I've found it's still not quite the same at times. I prefer to set it manually for all the shots and not worry about the camera's auto calculations. The reason for setting white balance is the lighting can change (at times drastically such as when shooting at dusk) whilst you're shooting the individual shots. The camera's auto calculations may therefore yield considerably different results between sucessive individual shots and I found this can be quite a problem...
  • Get to know your photostitching software: Whist the automatic photostitch generation may work fine most of the times, I've faced a few problems with particular photostitches (e.g. when the lighting isn't great or there isn't high contrast in the shots). In a number of these cases, I've been able to 'manually' correct these problems using some of the manual/advanced features of the photostitching software. Options like adding control points manually, adjusting yaw/pitch/roll, adjusting colour balance across the stitch etc...

That's about it for now. I'll try to come up with a further post later on about this subject with some more tips about what to be careful of etc. I thought I'd start off with what I think are the ideal basic camera and setup settings. I'll try to jot down a few pointers on what to avoid/what to shoot/how to go about dealing with certain issues with regard to the scene being shot/stitched together in a future post.